
*This post contains affiliate links, which means that if you click on one of the product links, I’ll receive compensation at no added cost to you.
Oh boy! It's been over a year since the last time that I updated here. A lot has happened throughout that year. We recently moved into a townhome style community and my husband and I both started new jobs. We aren't the only ones changing it seems though. IKEA seems to be spitting out new products, and almost identicals of older products.
A few months ago, Big A, Little A and I visited our closest IKEA in search of the EXPEDIT. When we walked into the self-serve area, were we surprised to see not only the EXPEDIT but an almost identical unit. This new unit, the KALLAX, was slightly cheaper, but seemed to be the long lost twin of the EXPEDIT. Seeing as it was cheaper, we went ahead and purchased the KALLAX. Let me just say, it is definitely worth the buy!
You see, since moving, we got rid of our TV stand that was unfortunately too large for the space that we had. And honestly, too heavy to move up our flight of stairs from the foyer to the living room. We needed to replace the lost TV stand, so to Pinterest I went to explore different ideas.

Oh boy! It's been over a year since the last time that I updated here. A lot has happened throughout that year. We recently moved into a townhome style community and my husband and I both started new jobs. We aren't the only ones changing it seems though. IKEA seems to be spitting out new products, and almost identicals of older products.
A few months ago, Big A, Little A and I visited our closest IKEA in search of the EXPEDIT. When we walked into the self-serve area, were we surprised to see not only the EXPEDIT but an almost identical unit. This new unit, the KALLAX, was slightly cheaper, but seemed to be the long lost twin of the EXPEDIT. Seeing as it was cheaper, we went ahead and purchased the KALLAX. Let me just say, it is definitely worth the buy!
 |
| Beautiful TV stand |
 |
| IKEA EXPEDIT turned TV stand |
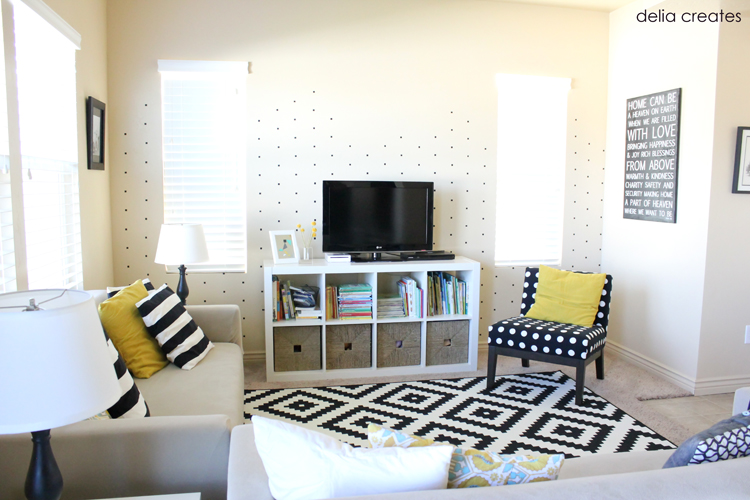
After seeing all of the many, MANY (addiction to Pinterest maybe?) ideas out there for a television stand, I tried to imagine what I could do for our living room to add a pop of color and be the focal point. I absolutely loved the last image, with the black and white room but with subtle hints of yellow. Our living room couch is grey, and our rug is a light blue. While I loved the white stand, I did really sway towards a stand popping with color. Every time I looked in IKEA, they didn't have the color that I wanted though. Cue the paint!
Now, I knew that IKEA furniture wasn't the easiest to paint, but boy did I not expect this severity! Hopefully, with my silliness, you can learn from my mistakes! My first mistake was just painting it without any sort of aid. You read that right! Sans primer and sanding! (Ahem, and yes we used spray paint, so much easier for us)
 |
| My wonderful husband spray painting |
.JPG) |
| First attempt at painting |
Now, after we let it dry, one scratch with a finger nail and the paint was jumping off! I almost cried. It took a while to paint every board, and here it was just coming right off! My husband wanted to throw in the towel. I'm not going to lie, the thought did cross my mind! I wasn't about to give up though, I had put too much time and effort into this project already with two coats and the dry period. I swore to him that I would finish this project.
After I had scraped of every single spot of paint, I restarted. This time, I used a hand sander. I scuffed up a few of the boards, which took at least two hours, and painted again. While it helped, it didn't exactly stay perfectly on. I guess I missed a few spots here and there. I was beyond tired! Again, I was not giving up! This project was kicking my tush!
.JPG) |
| Some sanded pieces repainted |
After the last failed attempt, I browsed Amazon's paint selection to try and get an idea of what kind of primer I was going to use. I had tried the sanding method, it was time to see if I could find a primer that worked. I looked up liquid sandpaper, then just primer. I was beat down, until I Zinsser B-I-N Primer*! I mean this thing has 5 stars!!
 |
| affiliate link |
Once I received the primer, I got to work. It did its job and then some! At this point, I had put the KALLAX together in an attempt to save time this go around. Man, that was my smartest idea apart from the primer! I painted all visible surfaces with the primer and let it dry. Then came the second coat and the second dry period. After it was completely dry, I spray painted one last time. Let me just say, it looked PERFECT. I loved the color that it turned out, and I loved that it didn't have a "just painted" smell. I let it dry once again, spray painted one more coat, and I was finished! Cue the hallelujah chorus!
.JPG)
I attached legs* that I had found at Lowe's with mounts* that I had also found at Lowe's and brought the beauty upstairs. By myself. With a three-year-old at my feet. Now that was one of the hardest tasks yet. When my husband got home, his reaction was definitely worth thehours weeks spent. And don't worry, I've got a project in mind soon to get rid of the eyesores that are the cords! And the lighting doesn't do it justice. There are, I promise, no random streaks! ;p
.JPG)
.JPG)
.JPG)
I attached legs* that I had found at Lowe's with mounts* that I had also found at Lowe's and brought the beauty upstairs. By myself. With a three-year-old at my feet. Now that was one of the hardest tasks yet. When my husband got home, his reaction was definitely worth the
So, after weeks of a draining, but potentially easy project, I had my pop of color! The battle was definitely worth it! Have you ever had any paint mishaps?
Linking up with these parties:
How did you get that long shelf in the middle?
ReplyDeleteHey there Lisa! It's actually just the boards it came with. Instead of placing a long board as it should be, in this case vertically, I placed it horizontally and removed the two smaller boards. I hope that makes sense!
DeleteHow did you mount the legs with the mounts? Are you able to screw into the kallax unit?
ReplyDeleteHey there! I was able to screw the legs right into the mounts! The mounts are specifically made for the types of legs that I linked in my blog post. The legs themselves don't screw onto the Kallax unit, but you do attach all four mounts onto the unit. I hope that made sense!
Delete