
*This post contains affiliate links, which means that if you click on one of the product links, I’ll receive compensation at no added cost to you.
Holy cow! It's been over a year since my last post! So much has happened that caused me to stay away for so long. I could go into detail, but let's just stick with the fun subjects shall we!


To finish the support, she cut two more boards from the 2x6x12's at a length of 27 1/4 inches, and attached them to the platform that she had created using the same method as before. In turn, it created a boarder around the bottom slab.

Taking a 1x4, she cut four squares at 3 1/2 inches. Fun fact, did you know that, even though it's "measured" at 1x4, it's actually half an inch shorter? (It measured 3 1/2 inches across) Anyways, back to the coffee table!


Holy cow! It's been over a year since my last post! So much has happened that caused me to stay away for so long. I could go into detail, but let's just stick with the fun subjects shall we!
Since my last post last year, I have been busy documenting any and all projects that me, and my family, take on. I had hoped that I would be able to spend the time to sit down one of these days and type out a few posts, but alas (as mentioned before) I did not! This post, in particular, has been the post that I have looked forward to doing for some time now! On to it!
My parents had been shopping around for a coffee table to complete their new living room set. The coffee table that they had for years before just wasn't matching their new and beautiful couch. screamed 'elegant' while the coffee table screamed 'ehhhh.' They just weren't compatible.
After searching and searching for a new coffee table at a reasonable price (the couch wasn't exactly cheap), my mom, the amazing do it yourselfer that she is, decided to tackle her own coffee table project. Lucky for me, she took pictures along the way! Yes, I know she does a lot of projects, but where do you think I get my DIY attitude from?
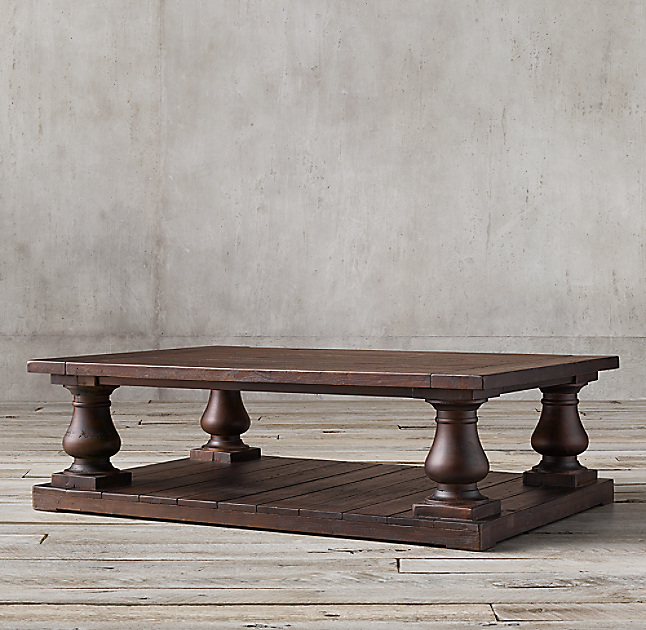
My mom had seen this beautiful Balustrade Salvaged Wood Coffee Table on the Restoration Hardware website. Like every other Restoration Hardware product, while amazingly beautiful, it was priced well outside of her budget. Can you guess the price? $1850!
Beautiful, right?
Searching a bit more, I was able to find this Magnussen Densbury Natural Pine Finish Wood Rectangular Cockatil Table* on Amazon that looked similar, but was still a bit pricey. $780.30 to be exact.

Now, that is immensely less than the Restoration Hardware table, but it's still pretty high in price. Being the savvy do-it-yourselfer that my mother is, she quickly drew up a plan and began to act it out.
To be able to put it together in a timely manner, she ordered four of the Traditional Coffee Table Legs in Knotty Pine* from Osborne Wood Products that she had found on Amazon first. This enabled her to purchase everything else and begin on the base and tabletop while waiting for the legs to arrive.
She started with the base support of the table. Taking two 2x6x12's, she cut eight boards 27 1/4 inches in length. She lined them up side by side to make sure they were all the correct size, and drilled slanted screw holes in the bottom, and attached each board together with Gorilla Wood Glue*. After gluing them together, she put a screw into each hole she created.

Next up came the support planks that she put across each side of the bottom. She cut two boards from a 2x6x12 at 44 inches in length, and attached them long way with more Gorilla Wood Glue and screws.

Taking a 1x4, she cut four squares at 3 1/2 inches. Fun fact, did you know that, even though it's "measured" at 1x4, it's actually half an inch shorter? (It measured 3 1/2 inches across) Anyways, back to the coffee table!
She affixed the newly cut squares onto each corner with 3 inch wood screws through pre-drilled holes, and of course a little bit of wood glue beforehand for added strength. Voila, the bottom is complete!
Next came the table top.
This time, she took 2x6x12 boards again, and cut them a little differently to achieve a finished look. She cut five of them to be 33 1/4 inches long, and two of the boards to be 27 1/4 inches. As before, she pre-drilled slanted holes in the bottom to attach each one together, making sure to add wood glue between each for extra support.
After drilling them all together through the pre-drilled holes, she let the glue dry overnight before finishing the build of the table.
Aren't those legs beautiful? At the time, they were on sale too! To complete the table, she took one of the 2x6's and cut it to 5 1/2 inches. (Again, the measurement for the board was 5 1/2 and not 6) After cutting eight of them, she attached each top and bottom of a leg to a 5 1/2 x 5 1/2 square with wood glue.
Attaching the legs to the table was easy. She flipped the bottom of the table on its side and screwed in each leg from the bottom with 4 inch wood screws through pre-drilled holes. Flipping it back, she took the top of the table, placed it on top of all four legs, and screwed the table top on using two 4 inch wood screws each leg. Phew! It was finally finished!
My mom wanted a worn look, so she took a hammer and beat up the wood a little bit. After everything, she filled all of the holes with Elmer's ProBond Wood Filler.
Last but not least was the stain! Oh how I love staining! Using a paintbrush, my mom put three layers of MinWax PolyShades in Bombay Mahoganny. After letting it dry for a day, she brought the beautiful finished table inside to complete the living room!
Ain't she a beaut? The living room finally looks like it was put together! It looks even better now!
Now, to plan out my own coffee table, what to do!
How do you think the living room looks with the coffee table?
Comments
Post a Comment